Sunday, 5 December 2010

Lir

Felt the mood to do more sketching rather than working on painting the Red Bull. Tut' Tut'.
Well, here is Prince Lir, foster-son of King Haggard (see previous post). I've tried to make him the opposite of Haggard, with a bit more bulk and a kinder features. It was hard at first to decide on how to make him attractive... in the end I just had to look at men I find attractive, like Josh Holloway and Philip Glenister, for inspiration... a good excuse as any to google search them *goofy smile*

Friday, 3 December 2010

Haggard

I do plan to do a quick colour version of this sketch in Photoshop... just don't know when.
Someone responding to my Harpy Celaeno said they would be interesting to see a King Haggard and Prince Lir character design (both from the same book, The Last Unicorn). I was happy to comply and slightly curious myself on designing these two, for I don't usually draw humans never mind trying to make a unique interesting character. Anyway, this is my take on the main villain, King Haggard. I applied the same principles onto him as I did to Erik in my Phantom of the Opera piece, they both being described as skeletal. Haggard is a sharp cruel character so a lot of sharp angles seemed to fit. Also he is described as coming from a foreign land (I think... I'll check some when) so it gave room to play around with his features (who's to say that all the humanoids from Haggard's birthplace don't look like this?). Some tattoos also seemed to fit so I dunked some on.
Hmmm, is his head too big?
Must remember Lir must pretty much be his foster-father's opposite in character and appearance.

Monday, 29 November 2010

The Harpy Celaeno


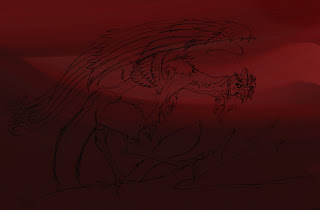
Well, here it is. Towards the end I imported into Photoshop to use the Dodge tool on the metallic wings and to add a moonlight glow on the edges. Most importantly it got me into ArtRage, which I will defiantly be using in the future.

Tuesday, 23 November 2010

The Harpy Celaeno: Part 4 (Starting to Render)

Have I said this before? ArtRage! I LOVE YOU!
I'm having so much fun doing the feathers with the brush tool. The Pencil tool was also used on the smaller parts and the hairs on the beard, it also worked well to add some texture to the skin.

The Harpy Celaeno: Part 3 (What Colour?)

Quickly I laid down some ideas for the colours and patterns. The first is a little bit like the colour palette of Celaeno from the animated film and I didn't like the cold palette. Because her name means "She who is Dark" I thought it would make more sense if her body was a dark maroon. The book also described her with bronze and/or gold plumage, weather in colour or texture (ie, actual metal) and these browns harmonise much better with a warm palette. I then had to think if I was going to add any patterns and markings. I'm still not sure, I may put some markings on her crest and maybe something on the tail, but I don't want to go over the top.


Sunday, 21 November 2010

The Harpy Celaeno: Part 2 (Branches )

Using the stencil tool, I created my own by
finding a picture of a branch on the Internet and then editing it so its a solid black and white image. Problem with the stencil tool is that it's hard to control, you can't resize the stencil- you have to zoom in/out the image until it fits the stencil (as that remains the same size when its placed down - but changes with the image to zoom/rotation ect.) After laying three branches on separate layers I erased and added forks so the branches don't look the same before using the Palette Knife to fuzz the edges, making it look as if the paint is bleeding into a wet surface. Merging all these branches together into one layer I lowered the opacity down a bit.


The foreground branch needed to be more detailed and this time I needed to make a "Mask" out of a stencil so I could use long brush strokes and not worry about it "Going out the lines". Quickly hiding all the layers apart from the basic black painted base of the branch I create a file as before (solid black and white) and got it to the right size. The Brush tool is fluid to use, with the Auto-Clean off the colours react to each other as long strokes go over the surface.
However, it didn't look "woody" enough and a bit plastic. So I got some reference and used the Pencil tool to emphasise edges and groves. The Pencil also added some grainy texture.

This is all I'm going to do to the background at the moment. I'll come back to it as the painting progresses. However, before I even got started on the Harpy herself I needed to make yet another stencil/mask. This time, as the shape was complex, I opened Photoshop and used the mask tool and filled the area with black. It's now all ready for the Brushes to play!

The Harpy Celaeno: Part 1 (Blood Moon)

ArtRage, I LOVE YOU! You're so fun and textured! *rubs metaphorical skin of ArtRage*

Using Beagle's book as inspiration for the colour scheme I thought a warm palette, blood reds and bronze/golds.
"A bloodshot moon burst out of the clouds, and the unicorn saw her- swollen gold, her streaming hair kindling, the cold, slow wings shaking the cage. The harpy was laughing."

Seeing as the moon was bloodshot I thought I'd make the sky bloodshot too. I think I've been watching too much of the Batman and Hellsing Anime (as their sky's are red and it works well to set a horror theme to their settings.)
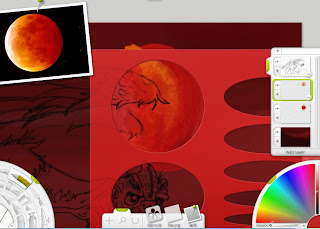
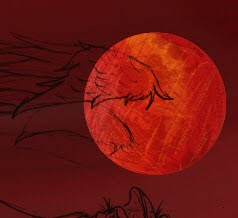
As ArtRage doesn't have a Mask tool, I was stumped on how to make a perfect circle for the moon. Using the brush was a no-no, as its set as an oval and would appear as a splat rather than a stamp (like in PhotoShop). Luckily I happened to remember playing with the Stencil tool (which can be seen at the bottom of the screen-cap to the right) and it had some circles there. Using photo reference I used the brush to blend in red,orange and reddish pink for the moon's colour then the Pen tool for the dark craters and finally some fine Pencil marks for the furrows and smaller marks. The end result was very pleasing, I think, and all done under 5min. I doubt it would have been that quick in PhotoShop.